
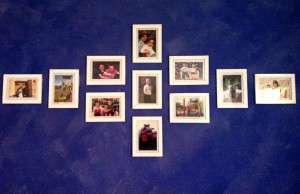
A simple but effective way of showcasing your treasured family photographs.
What you’ll need:
- 11 6×4 wooden picture frames
- Command picture hanging strips
- 5 photographs in portrait orientation
- 6 photographs in landscape orientation
- Ruler
- Pencil
- Paint (optional)
What to do:
Place photographs inside frames.
On the back of the frames attach Command picture hanging strips – the ones that join together and can be pulled apart. This way you can safely remove the frames and change the photographs inside and rehang.
Arrange frames on flat surface in desired arrangement.
On wall mark the centre and start attaching frames working from the middle of your design outwards using your ruler to keep them straight but also to keep the distance between frames equal. I hung the middle frame first then lay the ruler along the top edge and then hung the frame above it with the ruler still in place. I continued this for each placement.
Voila, an eye catching photo wall art that you can update regularly simply by rotating the photographs inside the frames.
Optional considerations: If you are going to hang these on a coloured feature wall as I did you may choose to paint your frames a neutral colour. Pull the frames apart and sand well before painting. It is best to use an undercoat first, a white will do nicely, and you will need to lightly sand in between coats of paint. I ended up using three coats of oil based paint, including an undercoat, leftover from another job that kept taking up room in the shed.
Arrangement: If wall space is an issue you can reduce the number of frames in your design. A simple designer trick is to keep the number of photographs uneven – it creates a little more interest to the eye!
Originally posted 2014-01-04 01:31:06.