
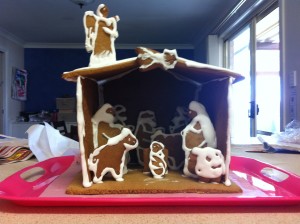
This is a rather ambitious project but it was a lot of fun and can actually be staggered over a couple of days if time is an issue. At the end of it though, you will have a Christian take on the gingerbread house tradition.
You will need:
- Ingredients and recipe for gingerbread
- Ingredients and recipe for royal icing
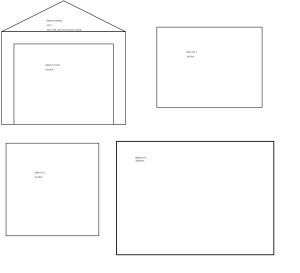
- Template
- Nativity cookie cutters
What to do:
Using our template, create your patterns on baking paper and cut to size.
Preheat oven to 180C. Using electric beaters beat 250g butter, 2/3cup brown sugar, 2/3cup golden syrup until light and creamy.
Add 2 eggs gradually beating well after each addition.
Sift 4 cups plain flour, 2/3cup self-raising flour, 2tbsp ground ginger, 1tbsp ground cinnamon and 2tsp bicarbonate soda onto butter mixture and use a knife until just combined.
With well-floured hands combine the dough thoroughly then turn onto a floured surface and knead for 1-2minutes or until smooth.
Line a large board (I used four small cake boards) with baking paper and roll out the dough until 5mm thick. Place in the fridge for 15 minutes or until firm enough to cut.
Using your templates and a non-serrated knife, cut around the templates on the gingerbread, carefully removing the excess which you can roll and use again. I then transferred the gingerbread and the baking paper underneath it, straight onto a baking tray.
Once you have finished cutting out the pieces for the stable, use your nativity cookie cutter set to create your nativity characters. (I got mine from Avon this year but there are others available)
Bake for 10 minutes or until lightly browned. Cool on wire racks.
Beat 2 egg whites with electric beaters until fluffy. Gradually add 1tsp lemon juice and 2 cups icing sugar and beat until thick and creamy. Colour if desired then, spoon into icing bags.
Starting with your base pipe icing along the bottom edge of the back piece of the stable and place in position. Use unopened cans to support piece until icing is dry.
Pipe icing along one side edge and the bottom edge of each side and place on base, lining up with back piece. Support with more cans if necessary. Pipe icing along the two side edges and the bottom edges of the front piece and place in position. (I broke my front piece when distracted by one of my children, and I carried on without it though the roof was not as well supported without it).
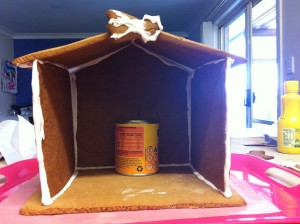
Pipe icing along the top edges of all pieces and attach the roof pieces as well as along the edges where they meet each other and position in place. Leave to dry.
Decorate as desired with more icing, in different colours and lollies or cauchous.
Decorate then add your nativity characters.
This will keep for up to a week.
Enjoy!
Originally posted 2013-12-13 06:15:22.
I’m going to give this a go! Quick question – On the front/back piece of the template, what is the measurement from the bottom to the bottom of the roof? Hope that makes sense. Trying to figure out where to start the slope for the roof.
I’m not actually sure, and ours has been eaten! The bottom of the roof, where it joins the house should be the same height as your side pieces, that is your slope should end at the same height as your sides. But when putting on the roof I recommend starting at the top most point and working down. That way you’ll have a nice overhang on the roof. Hope that helps!
Thanks Emily 🙂 That makes sense to use the height of the side, I should have thought of that! I ended up printing the template at full size (move the pieces around a bit in a graphic editing program so they fit on A4) which I think had given me the specified sizes. See how we go, I’m letting it set a bit before I add the roof!